CI process - the shared perspective
In my earlier blog of the CICD Series, I have highlighted the importance of Docker containers in the CICD process. Using Docker containers, you can create a consistent development environment that can be used by software engineers as well as DevOps systems.
In this edition, I will show you how to convert a Docker container used for development, into a Jenkins agent and yet retain the same experience for the developers. The goal is to show you that developers and the CI system (Jenkins for example) can leverage shared infrastructure and steps to build, package, test, and even deploy the code. This approach reduces environmental errors while creating software products.
Same Dockerfile, different docker containers
As mentioned earlier, the goal is to provide the same environment to developers and the CI/DevOps systems (Jenkins in my case). This is accomplished by creating a single Dockerfile and Docker image, but creating two different runtime containers by using different parameters for each scenario. Here is the outline:

We will use the entrypoint parameter to leverage the same Docker image for the two different environments.
Changes to the Dockerfile
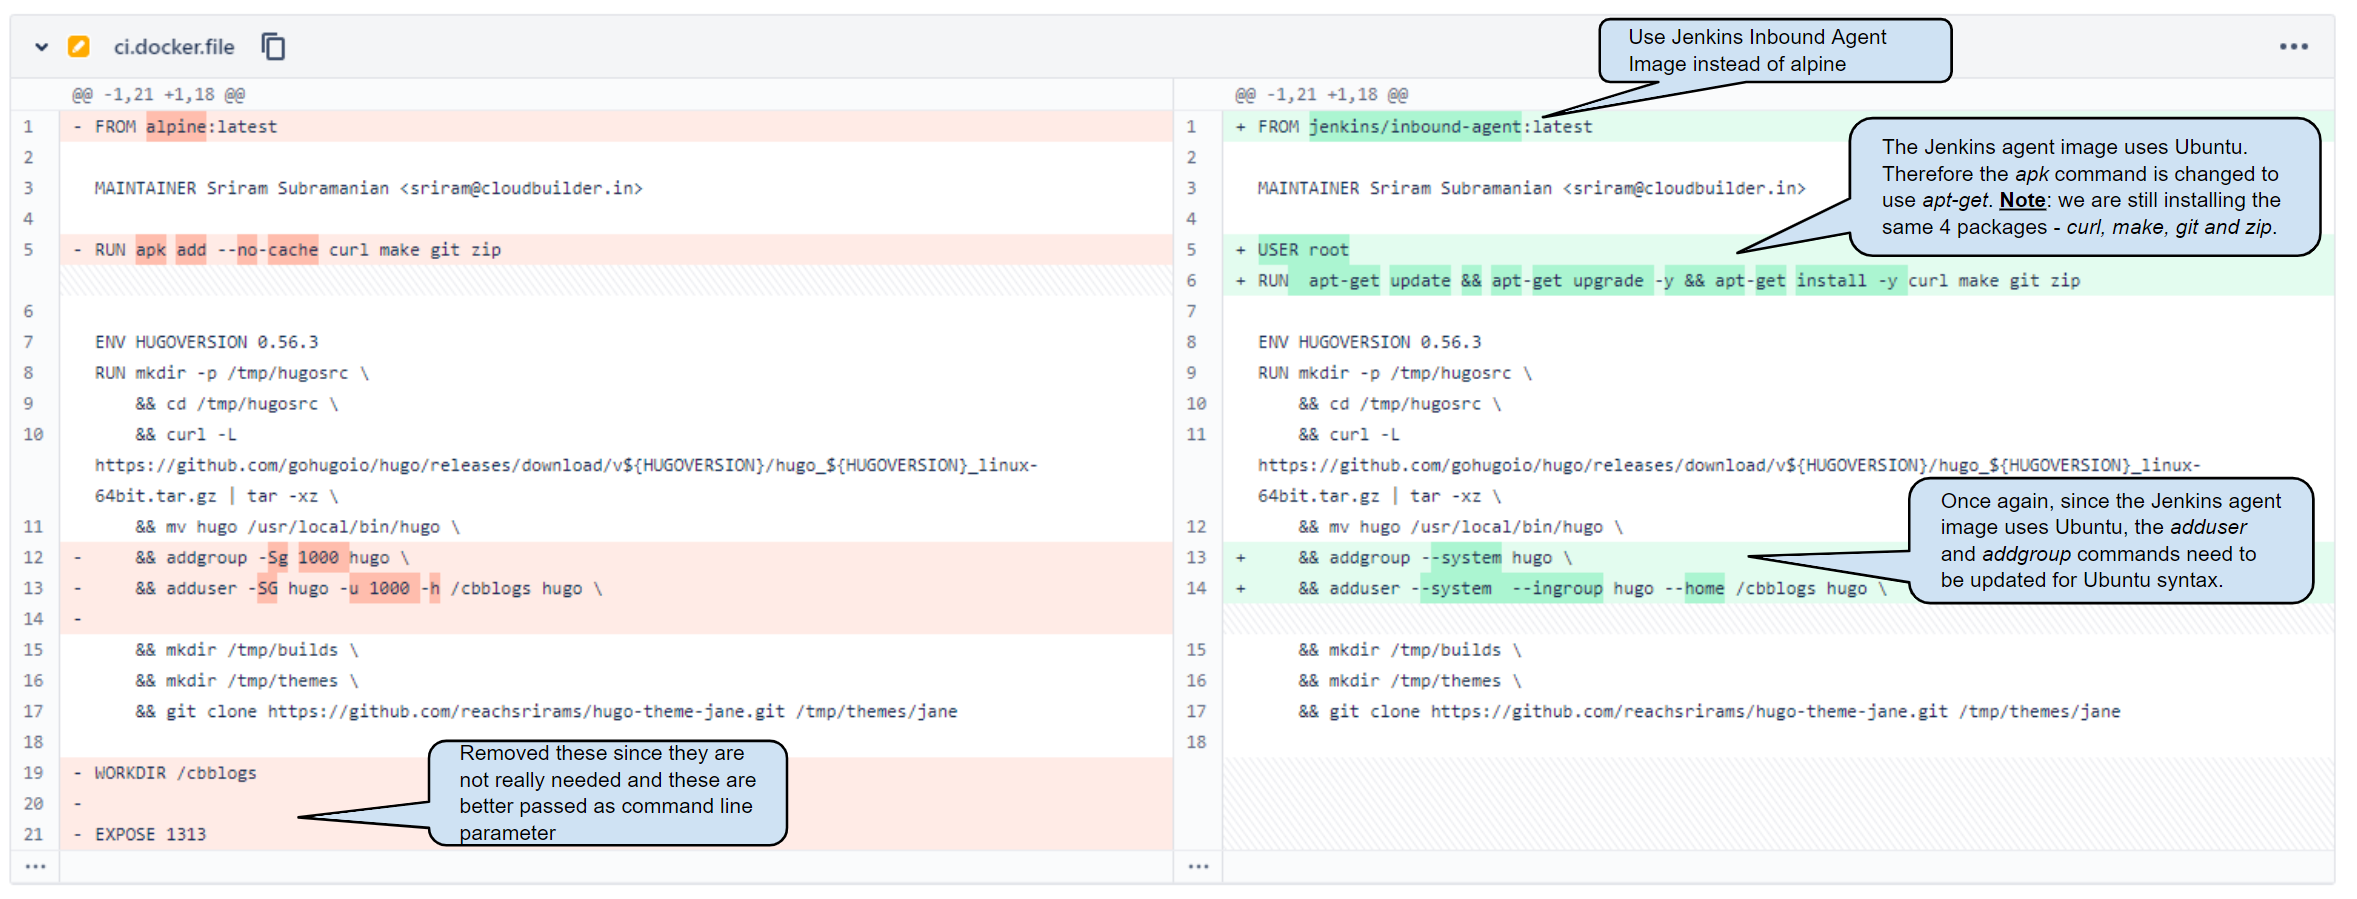
I will use my hugo based blog as an example to demonstrate the changes needed to create a common Dockerfile for Jenkins as well as developers. You can read about the original Dockerfile in this blog. Here is the diff that shows the changes made to the Dockerfile.
Please click on the image to enlarge and view the full change.

Using Jenkins agent based container for CI
As highlighted in the diff above, the main changes are related to the inbound-agent image of Jenkins as the base docker image. This is needed because we want to use the docker image for creating containers that would be used as build agents by Jenkins. The Jenkins base image uses Ubuntu because of which few other changes were necessary. I also removed some unwanted statements that could easily be passed as parameters to the docker run command.
Using the new Docker image as a developer
Since we have a new Docker image, let’s see how the docker run command has changed for a developer. Taking my blog as an example, let me show you how to use the new Docker image to run hugo locally and display the generated website. This is first step when you use hugo as a static blog generator. The make target is hugolocal.
Before
docker run --rm -it --name srihugo -v $PWD:/cbblogs:ro \
    -v $PWD/blogoutput:/cbblogs/blogoutput:rw \
    --expose 1313 --network host cloudbuilder/hugo:0.1 \
    make hugolocal
After
docker run --rm -it --name dev-hugo-ci -v $PWD:/cbblogs:ro \
    -v $PWD/blogoutput:/cbblogs/blogoutput:rw \
    --expose 1313 --network host --workdir '/cbblogs' --entrypoint "" cloudbuilder/hugo-ci:0.1 \
    make hugolocal
Another example is the make target called hugozip to generate the build artifact. This target creates a ZIP file of the static files generated by hugo and developers can use this ZIP file with web servers like apache or nginx to test the blog site.
Before
docker run --rm -it --name srihugo -v $PWD:/cbblogs:ro \
    -v $PWD/blogoutput:/cbblogs/blogoutput:rw \
    cloudbuilder/hugo:0.1 \
    make OUTPUT_DIR=/cbblogs/blogoutput hugozip
After
docker run --rm -it --name dev-hugo-ci -v $PWD:/cbblogs:ro \
    -v $PWD/blogoutput:/cbblogs/blogoutput:rw \
    --workdir '/cbblogs' --entrypoint "" cloudbuilder/hugo-ci:0.1 \
    make OUTPUT_DIR=/cbblogs/blogoutput hugozip
Explanation
Let me explain the changes done to the docker run command corresponding to the changes done to the Dockerfile.
- We removed the EXPOSE directive from the Dockerfile since it was already part of the command line as a parameter (--expose).
- We also removed the WORKDIR directive from the Dockerfile. There are two reasons for this. One, this is not needed for Jenkins and two, the developer can pass it as a command line parameter called --workdir.
- The most significant change is the use of --entrypoint “” parameter. The entrypoint parameter with empty value is needed to stop the Jenkins agent from looking for Jenkins specific settings. Remember, this command is executed by developers on their dev machine and they are not likely to have their own Jenkins infrastructure. In order to override the default behavior of the Jenkins inbound-agent, we need to pass --entrypoint “” as a parameter to the docker run command. When we use the same image as an agent, we will pass --entrypoint “jenkins-agent” as the parameter. More on this in the next blog.
Next up
So far we have seen that a Dockerfile with Jenkins agent related changes can be used by developers to build and test their code. In the next edition, I will show you how to use the same image as a Jenkins agent and generate the build artifact as part of a Jenkins job. That will complete the CI process. In the subsequent blog(s), I will demonstrate how CD can be implemented using the same generated artifact.