VirtualBox networking settings for OpenStack
The best way to learn OpenStack is by installing, running and playing with it directly. In this blog, I will share the details of the VirtualBox based multi-node OpenStack installation. I will be focusing only on the networking aspects when using VirtualBox. I will also share some tips that are important in this deployment. This blog will not cover the steps to install and create a virtual machine using VirtualBox.
While most people use DevStack to accomplish this I prefer to setup a multi-node installation. This is important for me because much of my work related to OpenStack revolves around Networking. Another reason is that a multi-node installation is what real users of OpenStack will also be deploying.
We will consider a two-node OpenStack setup with one node acting as API Server and Network Node (generally called Controller) and the second node acting as Compute node. We will also assume that VM instances require External network (Internet) access. The physical connectivity between the two nodes should be as follows:
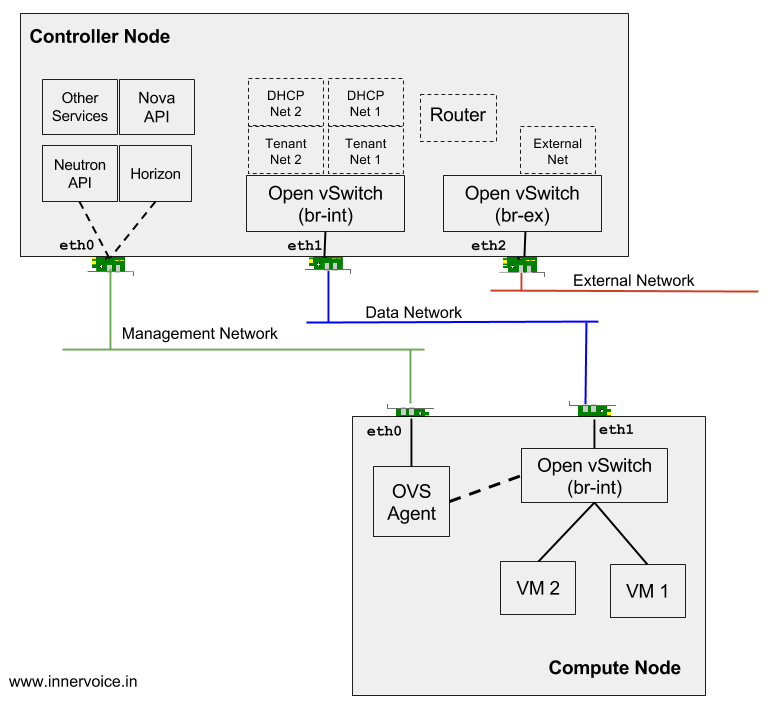
VirtualBox OpenStack Networking
As you can see you need at least three network interfaces on the controller node and two on the compute node. But since we are going to run these as virtual box instances, I recommend an additional interface. And shortly I will explain why the additional interface is useful. The tables below shows how each interface or adapter needs to be configured on Virtual Box.
VirtualBox Network settings for Controller Node
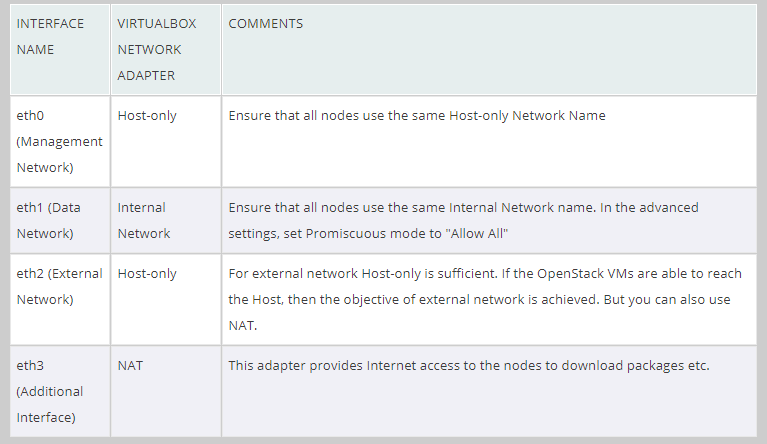
VirtualBox Settings for Controller Node
VirtualBox Network settings for Compute Node
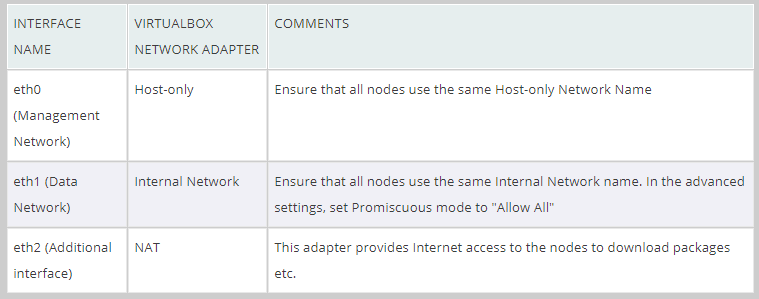
VirtualBox Settings for Compute Node
Tip: it is important to enable Promiscuous mode on eth1, the data traffic interfaces on both compute and controller node. Without this setting packets will not reach from OpenStack tenant VMs (that will be started inside the compute node), to the OpenStack controller.
Why the additional interface
The additional interface is very useful if you are running your virtual box instances on a laptop. Let us see why?
- The eth0 interface on the OpenStack nodes is used for API requests and responses. Typically, it is also used to access the Horizon GUI or to execute CLI via SSH.
- In the settings above, the eth0 is realized using VirtualBox ‘Host-only’ adapter. This ensures that all virtual machines on that ‘Host-only’ network and the host laptop are able to talk to each other.
- We could have used either a bridge adapter or NAT. But both approaches have drawbacks. If your laptop was without network connectivity, bridge adapter will not work. And with NAT you will need Port forwarding to be configured to access Horizon/SSH on the VM. This is cumbersome. So host-only network is the best option for eth0.
- But the VM instances also need Internet access. So I recommend an additional interface of type NAT_ _just to accomplish that.
In short, we have assigned separate network interfaces for Management Network and for Internet access for the OpenStack nodes (VirtualBox VMs).
Here are some useful links to learn more about VirtualBox Networking:
- VirtualBox Networking Manual
- How-to: VirtualBox Networking Part Two - NAT and Bridged
- How-to: VirtualBox Networking Part Three - Host-only and Internal