Setting up OpenStack at home
The goal of this blog is to share some details about how I have setup a cost-effective OpenStack Lab at home. For most enthusiasts, DevStack is the preferred way to experiment with OpenStack. But I wanted something more realistic for my experiments.
OpenStack is intended for multi-tenant, distributed and highly scalable cloud. To appreciate its architecture I needed to move beyond DevStack. With a more realistic setup, you can understand how the distributed OpenStack components interact with each other. If you are developing applications for the OpenStack platform, they need to be developed and tested in more realistic setups than DevStack.
And the biggest reason is to explore OpenStack’s networking functionality in a more practical way.
The OpenStack Setup
The picture below describes the setup. At this time, I have one dedicated compute node (based on Intel NUC). And I am reusing an existing laptop for the controller/API node. The key component in this setup is the networking.
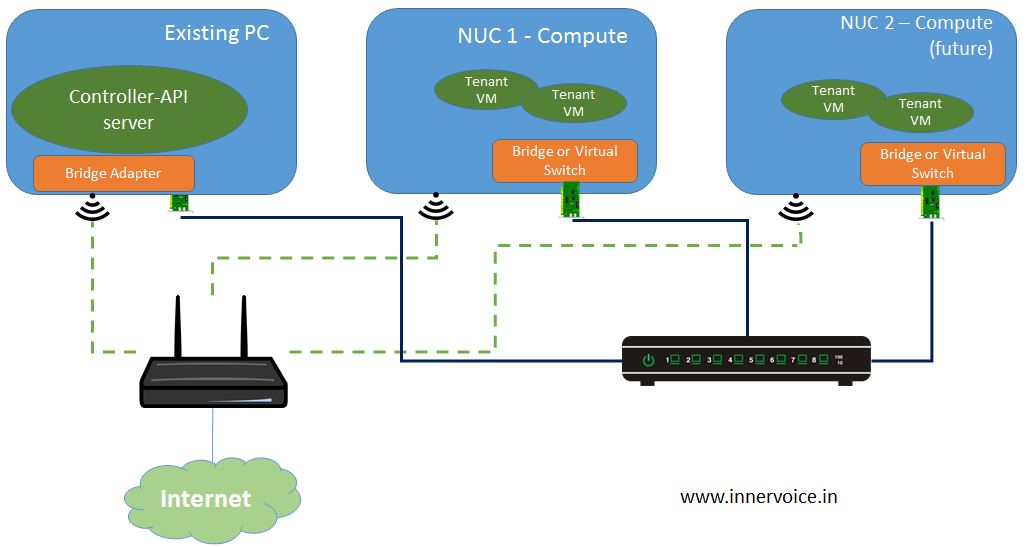
Home OpenStack Network
Network for VM-to-VM Traffic
It is common practice to give a dedicated network for carrying data traffic from the VMs in a data center. I have used the Ethernet interface on the NUC along with an Ethernet switch (iBall) to create this as a wired network.
Network for Management Traffic
We also need another network, commonly called management network, to be able to do SSH into each host. This network will also be used by the Controller to communicate with agents on the Compute Node. It is also essential that this network is connected to the Internet, so that I could download software packages. Hence I am using the wireless interfaces on these hosts and my home wireless network to create the management network.
About the Controller VM
The controller VM in the above diagram runs two important networking components (in addition to several others). You can use your existing DevStack setup as a controller provided it is connected to two network interfaces. This is required because the networking services such as Gateway and Router run on the Controller VM (in the above topology). And these services require access to management network as well as the VM traffic network.
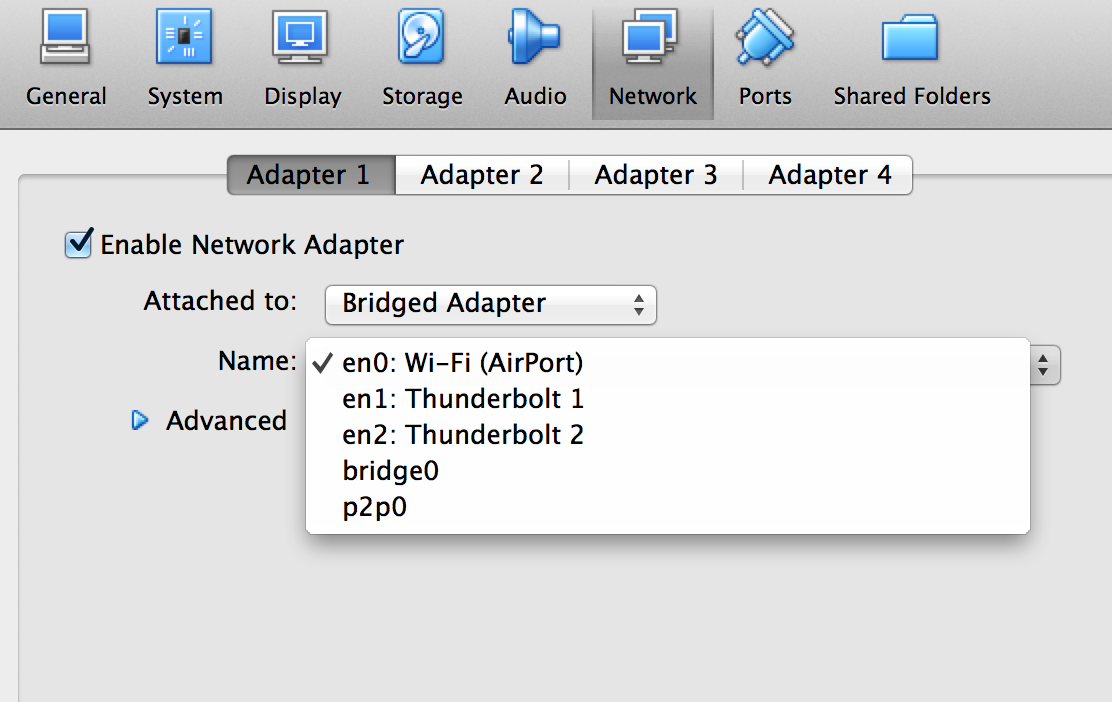
I strongly recommend that the controller be run as a DevStack VM using Virtual Box. This is because VirtualBox supports “bridged adapter” seamlessly.
Since we need two network interfaces for the Controller VM, I created two virtual Network Adapters in the Virtual Box settings. These virtual adapters were “attached to Bridged Adpater”. For one I selected the wireless interface on the host and for the other I selected the Ethernet interface on the host.
Why do we need the physical switch?
While home wifi network provides one physical network, we need another physical network that has switching capability. In real-world scenarios, OpenStack tenants require traffic isolation. This is accomplished in a simple manner using VLAN. So the main role for the physical switch is to provide network isolation using VLAN. Further advanced networking can also be experimented using additional wireless routers (spares if you have one).
Key hardware components
- Intel NUC Celeron Kit – DN2820FYKH
- This is the cheapest model with built-in wireless
- Only HDD and Low-voltage RAM is required
- You can watch my unboxing video here.
- You use the HDD from any spare USB drive (2.5 inch) to save costs.
- iBall Baton managed switch
- Low cost Ethernet switch with VLAN functionality
- There is no DHCP capability
- Good for our purpose
****Conclusion
The NUC (above model) is available for around INR 9000 on Flipkart.com. Depending on the amount of RAM and the HDD, you can expect an overall cost in the range of INR 14000 to 16000. The iBall switch should be available for less than INR 3000. I believe these are nominal prices for getting a robust home OpenStack setup with fairly rich networking capabilities. And I am hopeful of developing a much deeper and meaningful understanding of OpenStack using this setup.